One of my annoyances with “Smart TVs” is how they are still reliant on an antenna connection for live TV. It is possible to use apps instead for live TV, but you usually have to login to each app with a different login, and give up your privacy as the app tracks clicks throughout the navigation, watching habits, etc. It’s like having someone peering through your window constantly while you watch TV.
Even the Freeview app (the UK service for live broadcast TV), doesn’t allow you to stream in the same way you can receive a live TV signal. Instead, it manly acts as a guide which will then open the broadcaster’s app (e.g. BBC iPlayer), requiring you to login, if the broadcaster’s app is integrated at all.
So we’re left with broadcast TV instead, but this feels like a step backwards, and has it’s own issues:
- A cable has to run to each TV
- The signals are easily distorted by external sources, low quality cables, and long cable lengths.
- Splitting the cable can reduce the signal strength, or requires an amplifier, which can also amplify the noise.
- No on-demand services
There is no way we can solve the lack of on-demand services (legally), but we can reduce the signal issues.
Local IPTV
IPTV is technically TV which is broadcast over the internet, but we’re going to do the same locally. The concept is:
- To have a tuner connected directly to the antenna, using a high-quality shielded cable.
- The tuner then connects to the home network, allowing broadcast of the TV signals over Ethernet or WiFi.
This setup ensures that:
- There is no signal splitting,
- Cable length can be minimised,
- The signal can be accessed without a direct connection between the TV and the antenna.
Something to consider with this approach is heat. The antenna in your home can often be in loft space or on the roof. The closest indoor area to the antenna might not be the most sensible location, as the heat in these spaces may cause the tuner to switch off (overheating protection), or damage the circuit boards. It may be better to locate it slightly further away, with a single high-quality shielded cable from the antenna to the tuner.
Requirements
Below is the required software and hardware, along with the software versions and model of the HDHomeRun I used. This may work with other versions and models of the HDHomeRun, but you may need to research beforehand and adjust the setup as required.
-
Jellyfin (Version used:
10.10.7) - HDHomeRun (Model used: Flex Quatro)
-
TVHeadend (Version used:
4.3-2432~g0af87f13f)
Setup
Setup HDHomeRun
Setting up the HDHomeRun device is fairly straightforward:
- Connect device to ethernet, your antenna, and power
- Browse to the device in your browser, either by
http://hdhomerun.local/ or
http://<ipaddress>/ - Go to the channel lineup page
- If no channels are listed, click the “Detect Channels” button, and wait for the channel list to build
- Test:
- Right click one of the channel numbers and copy the link
- Open VLC
- In the media menu, select “Open Network Stream…”
- Paste the link into the URL field, and select play!
If the stream opens, then your HDHomeRun is configured.

Setup TVHeadend
Next, we’re going to setup TVHeadend. There are a few ways to configure this, but we’re going to use IPTV rather than DVB. There are a few advantages to this:
- TVHeadend when running in a container doesn’t need to be running in host network mode
- It avoids issues with DVB-T stream locking
- It is a more modern protocol
The disadvantage with this approach is that the EPG is not provided from the antenna. We’ll look at that in a later section.
There are two ways to configure TVHeadend with HDHomerun over IPTV. Most online guides show how to use the “IPTV Network” and manually create the channels. I’m going to cover using “IPTV Automatic Network” instead, using the lineup playlist file.
Some of the user interface and concepts in TVHeadend can be a little confusing. If you want more information, be sure to look at the TVHeadend documentation.
To setup TVHeadend for use with Jellyfin and HDHomerun:
-
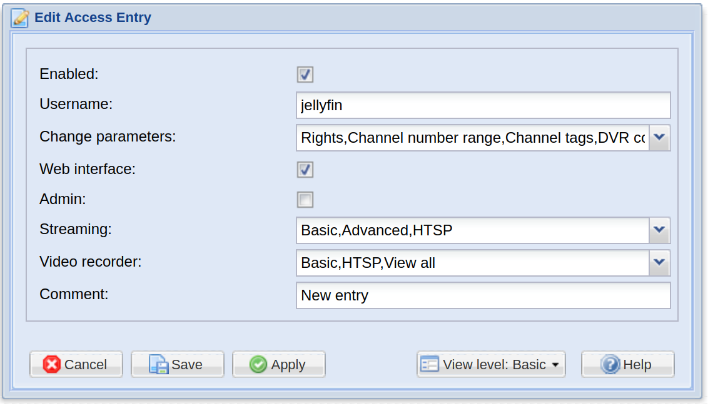
Create a user for Jellyfin:
-
Go to Configuration > Users > Access Entries > Add
-
Set the following:
- Enabled: Checked
- Username:
jellyfin - Change parameters:
- Rights
- Channel number range
- Channel tags
- DVR configurations
- Streaming profiles
- Connection limits
- Web interface: Checked
- Streaming:
- Basic
- Advanced
- HTSP
- Video recorder:
- Basic
- HTSP
- View all
-
Click Save
-
Go to Configuration > Users > Passwords > Add
-
Set the following:
- Enabled: Checked
- Username
jellyfin - Password: Create a strong password to use

-
Click Save
-
-
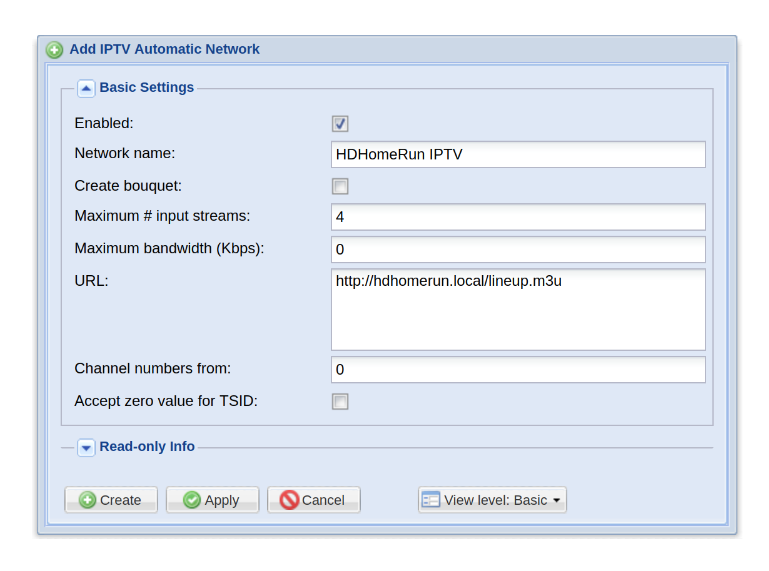
Create the network:
- Go to Configuration > DVB Inputs > Networks
- Click “Add”
- Select “IPTV Automatic Network”
- Select the “Enabled” checkbox
- Name your network (e.g.
HDHomeRun IPTV) - Set the maximum number of input streams based on your device. For the HDHomeRun Flex Quatro I used, it is 4.
- Set the URL. This will be the path to the channel lineup page on the device, but replacing
.htmlwith.m3u(e.g. http://hdhomerun.local/lineup.m3u). - Click “Create”
-
Wait for Muxes
- Go to Configuration > DVB Inputs > Muxes
- The muxes should be added automatically. Wait for the “Scan result” column to show
OKfor all of them.
-
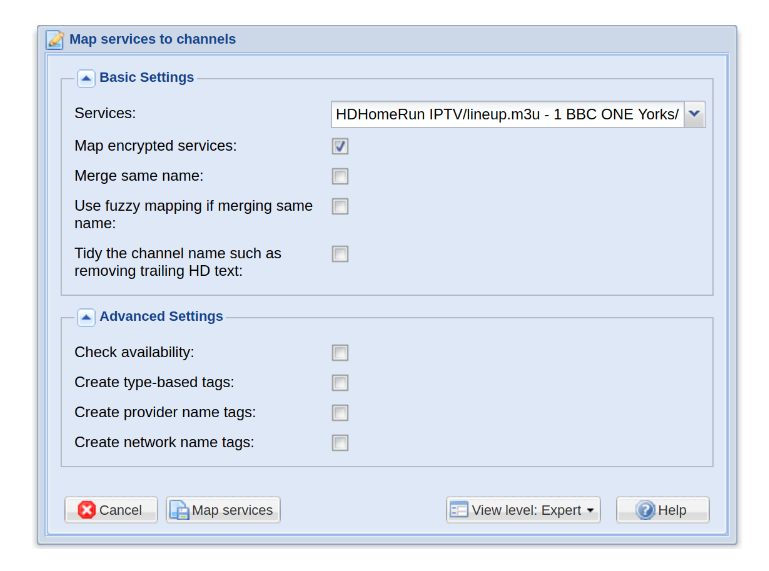
Setup channels
- Go to Configuration > DVB Inputs > Services
- In toolbar, select “Map Services” > “Map all services”
- Leave the defaults and click “Map services”
-
Test:
You can watch TVHeadend streams in the web interface, but didn’t work for me. That could be due to codec issues with Firefox.- In TVHeadend, go to Configuration > Channels / EPG > Channels
- Make a note of the “Number” column for one of the channels.
- Open VLC, and select “Open Network Stream…” from the media menu.
- Set the URL to https://tvheadend.app.g-de.co.uk/stream/channelnumber/1, adjusting the channel number as required.
- Click play!


If the stream opens, the basic TVHeadend configuration is complete.
If you encounter issues (or are just curious), go to the HDHomerun in your browser and go to the “Tuner status” page. It should show the selected channel for one of the tuners. You can also check the TVHeadend console output.

Setup JellyFin
- Install plugin
- Go to Menu > Dashboard
- Open Plugins > Catalogue
- Find and install “TVHeadend”
- Restart jellyfin
- While still in Dashboard view, select “Dashboard” from the menu
- Click “Restart”
- Configure plugin
- Go to Menu > Dashboard
- Open Plugins > My Plugins
- Select the TVHeadend plugin
- Set the hostname, username and password
- Test!
- Go to home
- Live TV
- Select “Channels” from the top menu
- Select a channel
Fixing the Channel Names
Due to the way HDHomeRun formats the playlist file, all of the channels will be prefixed with the channel number. Jellyfin will also prefix channels with the channel number, resulting in names such as “1 1 BBC One”.
Unfortunately, although the channel name without the prefix is in the playlist file (as the tvg-name tag), there doesn’t seem to be a way to have TVHeadend use this instead.
Given I only had 103 channels, I just updated them manually. It doesn’t take long once you get into a keyboard rhythm, and you only have to do it once.
Configure the EPG
I believe this step is optional, but Live TV without an EPG doesn’t seem the most useful, and having it enabled adds some nice functionality to Jellyfin.
Unfortunately, it is the most manual and tedious part of the setup.
-
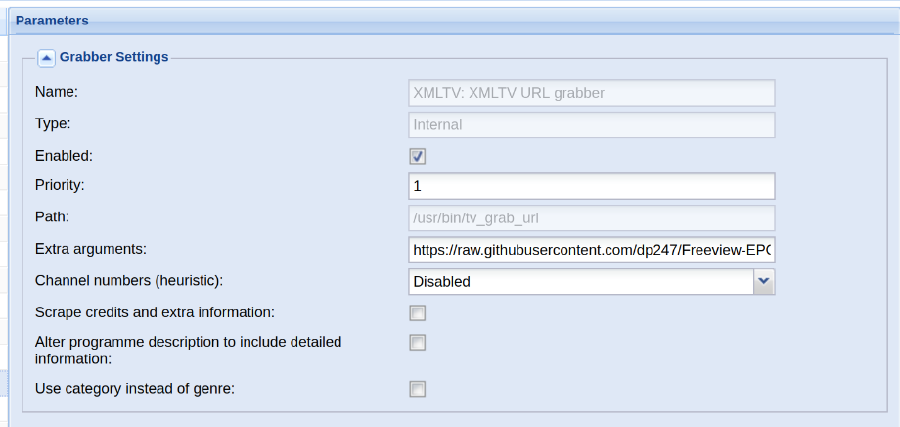
Configure EPG grabber in TVHeadend
- Go to Configuration > Channel / EPG > EPG Grabber Modules
- Disable all except “Internal: XMLTV: XMLTV Url Grabber”
- Select the “Enabled” checkbox
- Set the priority to 1
- For extra arguments, use the URL to an XMLTV guide for your country. For the UK, I used:
https://raw.githubusercontent.com/dp247/Freeview-EPG/master/epg.xml - Click “Save”
- The EPG grabber should run automatically, but click “Re-run internal EPG Grabbers” if not.
- Wait for the EPG Grabber to finish. You can monitor progress via the TVHeadend console output.
-
Map channel to EPG
- Go to Configuration > Channel / EPG > Channels
- Ensure the View Level is set to either Advanced or Expert
- Double click in EPG Source column for a channel
- Select the channel from the list (may have to wait for grabber to finish). In theory you can start typing the channel to filter the list, but I ran into issues where it would select the wrong channel sometimes. Remember to save regularly!
-
Test:
- Go to the Electronic Program Guide tab. The table should now display shows.
-
Refresh the EPG in Jellyfin
- Open Jellyfin
- Go to Menu > Administration > Dashboard
- In dashboard view, go to Live TV > Live TV
- Click “Refresh Guide Data”. Don’t worry that there is no tuner or guide provider configured. Jellyfin will read from the TVHeadend plugin instead.
- Wait for the guide refresh to complete.
-
Test:
- Go to the Jellyfin home page
- Select “Live TV”. You should see programs from the EPG.


Conclusion
So far the setup has been working great! A number of channels on one of my TVs which were not available due to signal issues, are now available again. The picture is also more stable, and now all of my media is in a single app. I don’t have to login to any apps, keep them all updated on all of my devices, keep accepting privacy updates, keep checking my privacy settings are correct, etc. If I need to adjust the antenna, I can also view the stream from my phone.
As an added bonus, using my home VPN connection, I am able to stream regional live TV to my devices wherever I am. Not that I have any need for that at the moment 😂